Beautiful Card Designs Made Easy

April 06, 2015

Neutral Colors ...

 Hi Everybody,

For this card I have used only black and cream to give me a really striking effect.

The card I have used is from Anna Griffin and it is such a wonderful quality

The sentiment is the free one from my magazine subscription but it was a couple of months ago and may not now be available

I have use Spellbinders Twisted Metal Tags and this is one on my  favorite tag dies

I have layered it onto Opulent Ovals #6  and added in two of the flourishes from Foliage Flourish to give a lovely swirly effect

The large flowers in the centre is one I made and added in the pearls.

The black pearl flourish around the sentiment and those in the corner of the card are  from Want2Scrap

More tomorrow ...

Hugs xx


April 05, 2015

Coloring time ...

 Hi Everybody,

Sitting with my pens to color an image is something I haven't done for quite some time and it is nice to take the time out to get back to it .... if only for a short time

This image is from a  Lily of the Valley  paper stack that I have had for a long time ... in fact I think it was free with a magazine

I used Chameleon Pens and then went ahead and made the card.

The dotty card is from AnnaMarie Designs and I have lined the inside with the same card

The ribbon is from Mei Flower  and I have tied it into a single bow at the top of the card.

The flowers just tumble down from the bow and they are from Wild Orchid Crafts  and are a lovely mixture of Chrysanthemums, Gypsophillia, Tulips and Roses

The panels behind the flowers is another one that has been embossed with  Grate Effect   and then I rubbed a pale pink ink pad over it to accentuate the design

Altogether a really pretty card and a very pleasant hour or two for me to color it in.

More tomorrow ...

Hugs xx

April 04, 2015

Blue Card Winner ...

Hi Everybody,

Sorry for the late post but we have visitors staying with us for the weekend and yesterday we had a lot to catch up with.

This morning in the beautiful sunshine we have had a wander around Lytham looking at many of the quaint shops there.  Of course we had to have a coffee break  before heading into Blackpool.

It is such a lovely day and it was good to take advantage of it.  And so I am late posting the winner of the blue card from yesterday.

But the draw has now been done and then name chosen is ...

Liz Turnbull
please email me 
christina@card-making-magic.com
with your postal address and I will get the card in the post to you straight away
I hope that you will like it and please let me know when it arrives with you.

So now it's time to freshen up and get back to my guests as we are off into town for something to eat and then later we are all going to the theatre for an entertaining evening at the Grand

More tomorrow ...

Hugs xx

April 03, 2015

Friday Freebie 053

Hi Everybody,

This pretty card is created with Sue Wilson  Spanish Collection dies and it  is layered with silver gilding flakes and pale blue

The flowers are from Wild Orchid Crafts  and for me they are always a wonderful addition to my cards

The diamante and pearl centre to the bow is also from WOC  and it is added to some pale blue ribbon that I have in my "Stash"

If this is a card that you would like to own then all you have to do is join the list of followers and leave me a comment and in the morning  a name will be chosen  from the comments.

I am happy to send the card to you wherever you live so please add your name.  And it doesn't matter if you have won one in the past you can still try again

More tomorrow ...

Hugs xx


April 02, 2015

With Love ...

Hi Everybody,

I have used a pale teal color from   AnnaMarie Designs   for this card

It is another that uses the raised technique with the sentiment that I showed you in the video tutorial yesterday and also the embossed background but I have tilted it this time for a different look

On this card I have added all the pretty things I love to use and the addition of some beautiful Guipure Lace from  Wild Orchid Crafts  along the bottom

It is made with  5x7 Matting Basics A&B  and I have created an embossed panel with Grate Effect

Classic Hearts  and  Classic Scalloped Hearts  are the focal point and the top layer to the heart has been embossed

Around the heart I have added the matching pearl "Bling" from  Want2Scrap

Bitty Blossoms  with pearl centres  and some of the leaves from  Foliage  make up my floral display and the effect is very feminine

More tomorrow ...

Hugs xx

April 01, 2015

Clean & Simple Card

Hi Everybody,

This pretty card is very simple for me ... and if you have been a regular follower then you will know how much I like to add the embellishments to my designs

But this one is using only Spellbinders dies to create every part of it and I really like the effect.

It is in a short vidoe for you to see the steps I took to make it and you are free to take those steps and utilise them as you wish.

I have used blue card in stripes spots and a birthday text from   AnnaMarie Designs  and the quality is a beautiful soft matt finish.


I particularly like the effect with the sentiment and this can be achieved with craft foam

But if you don't have any on hand then the same look can be done by cutting out the shape maybe four or five times and glueing them together


The dies I have used are ...

5x7 Matting basics A&B
Modern Stationery
Elegant Ovals
Pretty Petals A & B
Sentiments Three
Foliage

More tomorrow ...

Hugs xx


March 31, 2015

Tuesday Tutorial - Embossing with Dies

Hi Everybody,

I like to add texture to my cards and the background piece is the one that makes the card pop if embossed

This technique can be done with dies ... large or small ... that you have in your collection and give you a really pretty look

For this card I am using just the inner part of   Grate Effect  

I have also used Classic Hearts   and the matching Scalloped Classic Hearts

My flowers are from Bitty Blossoms  and I have another tutorial on my website showing how to get the best from Spellbinders Blossoms

Create your base card in your chosen color and I like to make mine to the Hinged Card Style

My base card is white and I have chosen a patterned card for the next layer which is slightly smaller

I have cut another piece of white card that is the same size as the Grate Effect die and layered it up to pass through the Grand Calibur

You will need to check your machine for the correct sandwich to EMBOSS


The correct sandwich for embossing  with the GC is ...

Grey Base plate ... die template facing up

Cover it with the lightly spritzed  card 

Cover with the TAN embossing mat 

Cover with the Pink Embossing Plate

And once you have run it through this is the effect you will have in your card

It will be embossed and not cut and once trimmed to fit the front of your card will create a beautiful layer for you


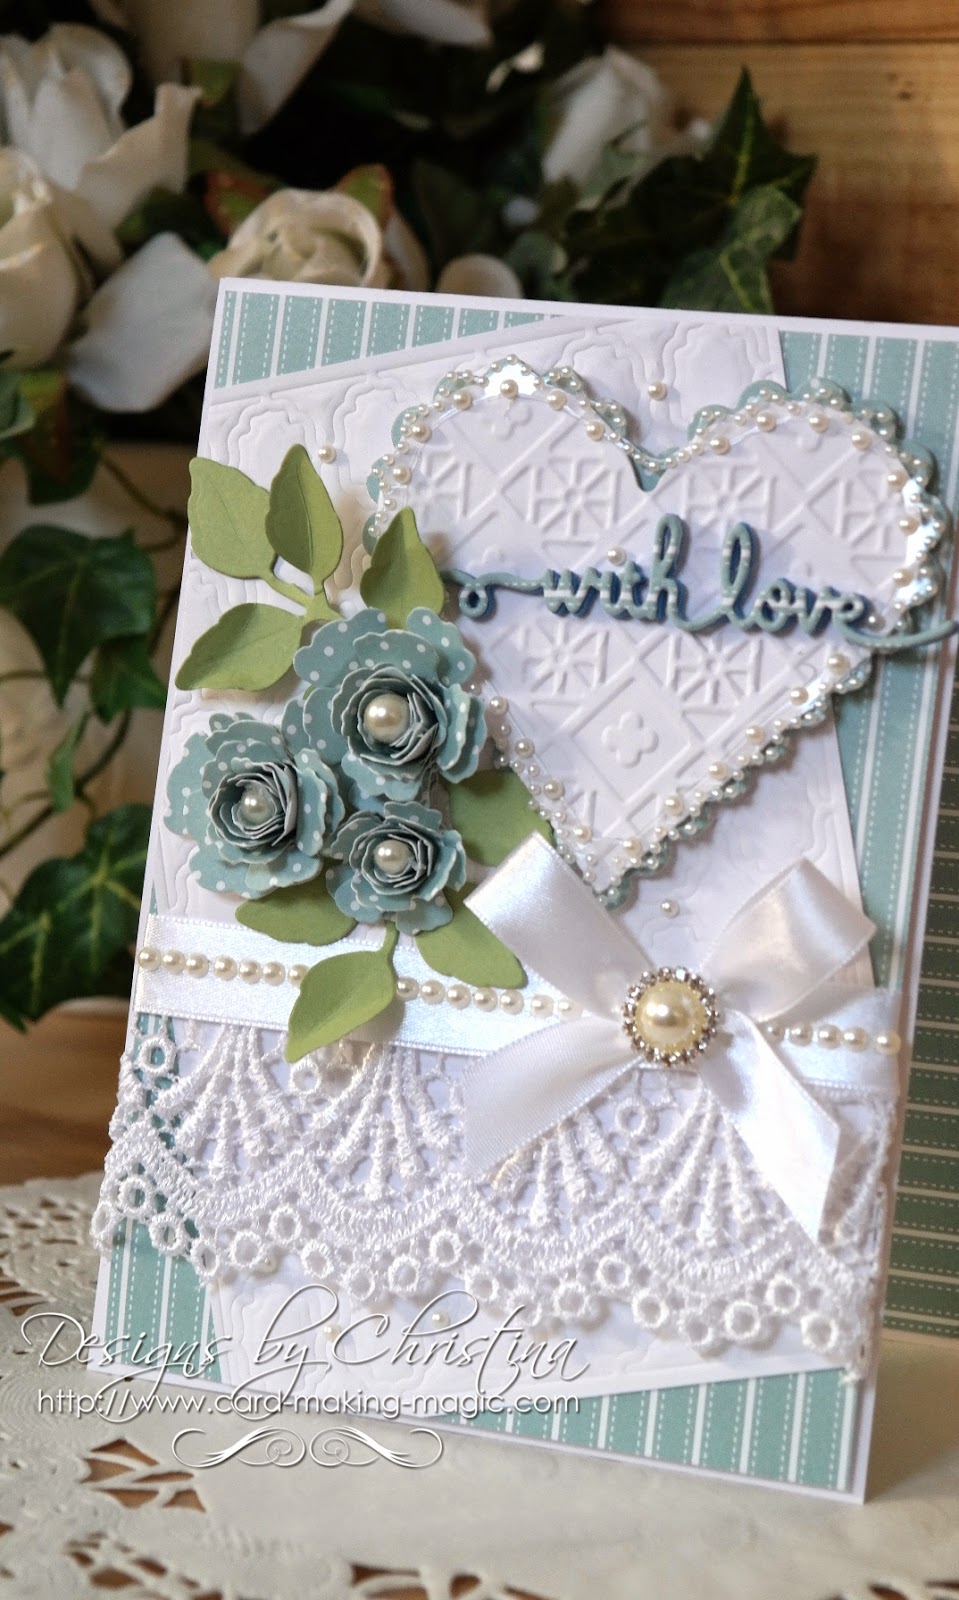
From both sets of Hearts I have used the #6 (#1 is always the smallest) and cut one in white and the other from some patterned card

The white heart I have then embossed with a folder

From the Bitty Blossoms cut the flowers that you need to add to your design and glue a small pearl to the centre of each flower

And I have used some leaves from Spellbinders  Foliage  and tucked them under the blooms
This close up shows you the quilted effect that the embossing will give to your cards

I have used small pearls from Want2Scrap to accentuate each cross section


More tomorrow ...

Hugs xx


March 30, 2015

Distress Inked Card

Hi Everybody,

Todays card has all my usual embellishments applied and I am really pleased with the way this card has turned out.

But it is the background that I really like,  as that was done with water colors,  and it is a bit of a stray off my usual path for this

I used water color card from Crafters Companion  as it is good quality and quite thick

I used Distress Inks and a craft mat to get the result and lots of water and then simply played with it all until I was happy

The card is a 5x7 with the hinge at the top and the inside is lined too.

My flowers, dove and metal corner are all from Wild Orchid Crafts

The ribbon is from Mei Flower  and the pink pearls on the ribbon and surrounding the flowers are from Want2Scrap

The metal corner was originally gold but I changed the color with embossing powders.

The stamp is part of a set that I bought at a craft show a few years ago and can't remember who makes it

Quite a pretty card and one I am happy to add my name too

More tomorrow ...

Hugs xx


March 29, 2015

Card Class ...

Hi Everybody,

In our card class the other week I had my ladies decorating some of those snack tubs we all love

I let them lose with flowers, ribbons and pearls ... as well as pretty papers, tulle and lace

These delightful tubs look a whole lot more beautiful when they are covered and both ladies are pleased with their efforts.

I have titled them so that you can see the color choices of Mary and Brenda and I think they look so pretty that they could be given as small gifts.

I made some from the larger tubs a while ago and when Isabella saw them she loved them.  Isabella is three and my Great Grand-daughter and when asked which color tub she wanted she said  ...." Er! Both"

On these we have used flowers and pearls strings from Wild Orchid Crafts  and satin ribbons from Mei Flower

More tomorrow ...

Hugs 

March 28, 2015

Another winner ...

Hi Everybody,

What a difference in the weather today.  Yesterday was lovely and sunny and we managed to get some tidying up done in the garden ... but today it's wet and windy and not pleasant at all.

Time to stay indoors and just chill, maybe do a spot of crafting ... for a change

The winner for yesterdays blue card has been done and the name drawn from the hat is ...

Gingernuts ...

can you send me your postal address please to
christina@card-making-magic.com
and I will get the card in the post to you straight away

Please let me know when it arrives with you and I really hope you will like it

More tomorrow ...

Hugs xx

March 27, 2015

Friday Freebie 052

Hi Everybody,

One whole year of Friday Freebies and another one soon to start.

This card has used a mixture of dies and they are  all layered up with foam tape.

The white layer is embossed with a basket weave pattern and the layered onto the blue

I have wrapped the layers with ribbon before adding to the base card

The next layer is in blue and I have used 5x7 Reflective Moments

The smaller white layer is Decorative Labels Eight
which has also been embossed

Then over the top I have used Lattice Motifs but this is a die you will have to search for as it is no longer on the Spellbinders website.

I do not deliberately choose dies that are no longer available it's just that I have these dies in my crafting "Stash" and I still like them and use them.  I am so sorry if you cannot find them ... but that is progress I suppose

If you would like to have this card on its way to your house then join the group of followers and leave me a comment.  A name will be chosen at random and the winner announced in tomorrows  blog post.  Please come back to check if you are the winner.

More tomorrow ...

Hugs xx


March 26, 2015

Tone on Tone

Hi Everybody,

Todays card has used nothing other than white and shades of it and this card looks lovely in real life.

I have just added an everyday verse but it would make a beautiful wedding card

The verse I have used is one of a set from Crafters Companions Sentimentals Range   and if you click the link it will you the stamp sheet.

(I have used the one in the bottom left corner and stamped and embossed it in silver)

The  white satin ribbon I have used is from Mei Flower with a large sparkly dazzler over the knot.

The diamante is from Want2Scrap  and I have just used portions of it for my design

The beautiful flowers are from Wild Orchid Crafts and I have arranged the display around the sentiment.

This is such a pretty card and the background panel has been embossed and backed onto silver card and then onto a white base card that is 7" square

On the next panel I have used some modelling paste through a stencil and then sprinkled glitter into it while it was still wet.  The result is a raised finished that shines with glitter but the camera has not really picked it up. I used a corner rounder to shape the edges and that too has been layered onto silver

I have stamped my sentiment on to Labels Eleven but this is a die that has now been discontinued

 I have another card done with the same modelling paste and glitter technique that I will show you next week as tomorrow is Friday Freebie again

More tomorrow ...

Hugs xx

March 25, 2015

Centura Pearl ...

Hi Everybody,

It is amazing what you find once you start to clear out your craft room. It's like Christmas all over again.

I am finding things that I had forgotten about and this lovely  Centura Pearl   from Crafters Companion  was in  the back of the cupboard.

So I decided to make a card using the Victorian Collection - Medallion Three 

This is the die I have used to show you some variations with in the Tuesday Tutorials and here is another one using the #2 part of the die that leaves the pattern in the card.

This has been backed with the Centura Pearl and then decorated with ribbon from my "Stash"

The Flowers are from Wild Orchid Crafts

I have added in some green leaves cut from   Foliage    which is a really useful die to have in your collection ... especially if you like to add flowers

The pearl flourish is from Want2Scrap  and don't be afraid to cut it up.  You can probably get three cards from one flourish

The  Sentiment One  is also from Spellbinders and again is a useful addition if your writing is not the neatest .... like mine ... I keep all my sentiment dies on my work area so that I can just grab one as needed.

Just a little note ... 

I have added a permanent link in the side bar to your right for all the Tuesday Tutorials that have been done and I will add them as I do them in the future.  Each one will have a direct link to the named tutorial so they should be easier to find

More tomorrow ...

Hugs xx


March 24, 2015

Tuesday Tutorial - Captivating Squares

Hi Everybody,

Todays beautiful card is created with the Captivating Squares from Spellbinders

This could be a die that you already have in your crafting "Stash" as it has been around for quite some time.

There are many ways to use this die and this is just one of them.
I have cut two 6" squares and created the base card with a hinge

Then from some plain pink I have cut a smaller layer and repeated the process with some pink spotty card
From #3 and #4 Captivating Squares I have cut four frames   (and remember that #1 is always the smallest die in any set)

Keep the centre parts as you will need one of them later.


Layer these together in sets of two off setting them with each other as shown in the photo

Just a spot of glue in strategic places will hold these together for you

Then with some foam tape between the layers lay the top two on the bottom two and off set them again

Now you should have a very pretty lacey centre for your card.

Place more foam pads under these layers so that it cannot be seen from the front

Add these to the base card and decorate as you wish.  I have used flowers from   Wild Orchid Crafts and some pearls from Want2Scrap  around the edge of the frame


With the pieces that are left over stamp  and emboss your sentiment on one of them

The rest can be used on another project so keep them safe

Add a double layer  of foam tape underneath to raise it up over the level of the frame

And there you will have another very pretty card to add to your collection.

More tomorrow ...

Hugs xx

March 23, 2015

Negative Effect ...

Click to enlarge
Hi Everybody,

When we make cards there is such a lot of card that we discard.

But with just a little thought and some planning ahead we can put it to good use and make some pretty cards.

I needed some butterflies for another card that I was making and I used the Spellbinders Les Papillions Two 

I used the solid base to the die and rather than just cut it out randomly I carefully positioned one on some card that I would use for my top layer

Once cut and embossed this negative piece was the piece I used for this card.  I also cut another piece in pink and used it underneath as a shadow but the butterflies have been kept safely for the next card

The pink card in the negative space says "Happy Birthday"  and is from  AnnaMarie Designs

The embossing folder is from Crafters Companion

I used a large flourish from Want2Scrap for the butterfly trail

And there is my free sentiment again  from  Simply Cards and Papercrafts   Magazine stamped and embossed at the bottom of the card.

It really was that simple to make this card and yet the result is very pretty

More tomorrow ...

Hugs xx